If you've been following the saga at Ultra Fine Flair, you knew this was coming.
A crab apple, not to be confused with a non-crab apple apple, can't make up its mind. Most days, it's a useless fruit that falls into someone's lawn in Southwestern Ontario or the Northeastern United States, and, much to the chagrin of Bills-loving homeowners, rots. Occasionally (and unfortunately, much more rarely), it's a fruit that smells mouth-wateringly sweet, tastes mouth-puckeringly tart, and produces an abundance of juice that can be coaxed, through various stages involving de-stemming, boiling, sugaring, and filtering through cheesecloth, into an electric red and very tasty jelly.
Despite their proliferation in backyards this time of year, crab apples are apparently hard to come by. We visited farms, farm stands, and farmers' markets. I think that was our biggest mistake, actually, because nobody grows these trees on purpose. We'd have been better off visiting area yard sales and surreptitiously gathering the fallen fruit (possibly while simultaneously haggling over the price of a toaster). We finally found some, and negotiated a price of $25/bushel.
Note: A bushel is more than you'll ever need. Even my Special Ladies could only use half. It broke my heart a little to see the rest of that fruit rotting, but we do have enough crab apple jelly for the duration.
In the interest of research, I grabbed a few to photograph and taste. We even took some to the beach!
We both sampled a crab apple. This particular variety smells sweet and tastes tart, although not inedibly so. They're not the most efficient snack, though, unless you have a very small mouth.
Ken opted to eat a plum instead. It was very pretty inside.
A local seagull, however, was not so discriminating. After I chucked an excess crab apple onto the sand beside me, he nabbed it and ran off. À chacun son goût.
UFF Fruit Rating:
07 September 2010
11 June 2010
Saucy Pizza
Sounds a little bit naughty, doesn't it?
I like my pizza with a thin, crispy crust. Fresh mozzarella, if it's available, is delish. Big basil leaves, yes please, and pass the oregano and red pepper flakes. And, for as long as I can remember, I've ordered pizza with extra sauce. I love me some good saucy pizza. Unfortunately, my passion for plentiful stewed tomatoes isn't shared by my Argentine counterparts, who seem to prefer pizza that's bready and cheesy, but not so much saucy. There is sauce, to be sure, but during the pizza-making process it gets all mixed in with the cheese, and in the process, kind of lost.
All of this isn't to say that I'll turn down any pizza. From the place next to where I worked in California with the deep-fried crusts (yes, that is as good as it sounds), to a giant $2 NYC slice, to an Argentina-style pie, offer me pizza, and I'm in. But I also like a project, and it's been forever since I've made pizza at home, so that's just what I did.
Full disclosure: I cheated a bit. The crust is from scratch, and couldn't be easier. The sauce, however, was from a can. It was a little too sweet, and next time I'm totally going all the way and making my own. But importantly, there was loads of it, probably enough for two pizzas, but all piled onto a single pie. Yum.
Pizza Crust: Really Simple Pizza Dough from Smitten Kitchen (I used half whole-wheat flour)
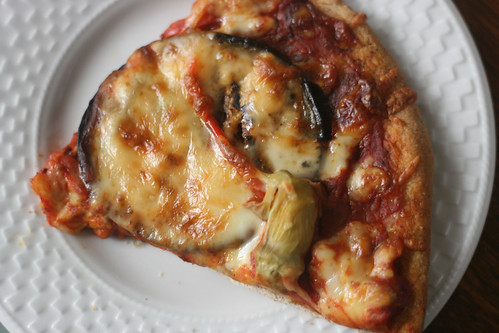
We topped half with bondiola, and the other half with eggplant, red peppers and artichoke hearts, because while Ken loves him some pork, I'm still trying to keep a couple of functional arteries.
03 June 2010
Make This Salad
Salad schmalad, right?
Well, yes, but I'm living in the land of huge, artery-clogging steaks and doughy, cheesy pizzas and empanadas. And down here it's almost winter, which means we're swimming in root vegetables, and oh dear lord help me if I read one more Northern-Hemisphere blog about strawberries.
You'll freeze some for me, won't you?
Let's be clear: When you order salad at a parrilla (Argentine grill), the default is ensalada mixta, which involves a few sad-looking torn-up bits of lettuce, hunks of mealy tomatoes, and heaps of raw white onions. But you order it anyway, because it makes you feel just a little less guilty about the unnecessarily large yet oh-so-delicious slab of meat you're about to consume.
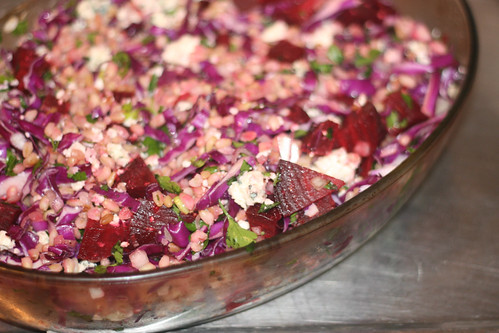
Anyway, in my remaining two months in Argentina, I'm trying to not eat meat at every meal, and also to not contract scurvy. Here in Buenos Aires we prove daily that necessity is the mother of invention. My British friend Sarah discovered the SAP (Second Audio Program) button on her TV when she was trying to figure out how to watch "The Simpsons" in English. And I "created" this salad when I couldn't find many of the ingredients in the original recipe. This version is delicious, and the cabbage will help keep up the ol' vitamin C levels.
Farro, Cabbage, and Roasted Beet Salad
adapted from Epicurious.com
3 large beets, tops trimmed to 1"
1 c semi-pearled farro or wheat berries (note: in Spanish, this is called trigo candeal pelado - at least that's what I used and it's very tasty)
2 T extra-virgin olive oil, plus more for roasting the beets
2 T red wine vinegar
1 garlic clove, minced
1/4 large head of red cabbage, stemmed and chopped
1/2 c finely chopped onion
1/3 c chopped fresh Italian parsley
1 c crumbled blue cheese (about 4 oz/100 g)
Preheat oven to 350°F. Arrange beets in single layer in 8 x 8 x 2-inch baking dish. Drizzle with olive oil. Roast until beets are tender, about an hour. Cool. Trim beets; peel.
Cook farro in large saucepan of boiling salted water until tender, stirring occasionally, about 20 minutes. Note: Your grain's cooking time may vary. Mine took longer, over half an hour. Drain. Transfer to large bowl. Stir 2 tablespoons olive oil, 1 tablespoon vinegar, and garlic into hot farro. Cool to room temperature.
Cut each beet into bite-sized cubes. Add beets, cabbage, onion, and parsley to farro; toss to incorporate evenly. Add blue cheese. Season to taste. Note: The farro (or whatever it was I used) seemed to absorb a lot of salt from the cooking water, so I only added a few twists of freshly-ground pepper at the end, and it was perfect.
I suspect this salad is infinitely malleable. I already want to add a can of chickpeas (rinsed), and some toasted chopped walnuts. The beets could easily be swapped for diced tomatoes, in which case I might also use basil instead of parsley. Yum.
30 May 2010
Yoav's Breakfast Chili
This is Yoav and Denise.
This picture was taken on Christmas, 2008, because even though I just visited them in Toronto I didn't take one picture of them together. Shame on me. I did, however, have a great time hanging out in their backyard, eating pizza and enjoying the many, many hours of daylight that Ontario has to offer this time of year. And I found out that in October they're going to be parents to one of the luckiest babies ever. I can't wait to meet him/her (updated! hooray!).
I also got to try their new breakfast creation, which involved Yoav's homemade chili served up with eggs and avocado. It was delicious, and I was inspired to recreate it when I got back to Buenos Aires last week.
It is so tasty. Please do try this at home.
I used the Beef and Dark Beer Chili recipe from Epicurious.com, which I chose because I like cooking with beer. The flavour wasn't quite intense enough, but I think that's probably because Argentines are not generally counted among those who like it hot, and it's hard to find a good strong chili powder here. But still. Eggs & chili. Did I mention that's going to be one lucky kid?
This picture was taken on Christmas, 2008, because even though I just visited them in Toronto I didn't take one picture of them together. Shame on me. I did, however, have a great time hanging out in their backyard, eating pizza and enjoying the many, many hours of daylight that Ontario has to offer this time of year. And I found out that in October they're going to be parents to one of the luckiest babies ever. I can't wait to meet him
I also got to try their new breakfast creation, which involved Yoav's homemade chili served up with eggs and avocado. It was delicious, and I was inspired to recreate it when I got back to Buenos Aires last week.
It is so tasty. Please do try this at home.
I used the Beef and Dark Beer Chili recipe from Epicurious.com, which I chose because I like cooking with beer. The flavour wasn't quite intense enough, but I think that's probably because Argentines are not generally counted among those who like it hot, and it's hard to find a good strong chili powder here. But still. Eggs & chili. Did I mention that's going to be one lucky kid?
19 April 2010
Brown Butter
Did you know about brown butter? Did you know that if you just take a knob of butter and cook it in a small saucepan over medium heat, it will sizzle and then bubble and froth and then settle down and start to smell nutty and delicious? Did you know that if you then pour that brown butter into a bowl and let it cool for a while, it tastes like a deep, spicy caramel, and can be mixed with a bit of powdered sugar and milk to make the most delicious frosting?
And if you knew, why didn't you tell me?
Part of my Friday afternoon surfing for food porn involved browsing Martha Stewart's cupcakes. After I wiped the drool off my keyboard, made a small batch of Mrs. Kostrya's Spice Cupcakes to take to a dinner party. Then on Saturday I baked a whole batch of Strawberry Cupcakes for a baby shower.
The spice cupcakes were tasty and gingerbready, and I will make them again, maybe with even more spices. Chopped up candied ginger would also be a delicious addition. The strawberry cupcakes weren't quite as strawberryish as I'd like, and I'll wait to make them again until strawberries are in season and are bursting with strawberry flavour, and even then I'll probably add half a cup or so of strawberry purée to the batter. But I won't change a thing about either frosting, both of which were made with varying quantities of brown butter, confectioners' sugar, and milk, more or less following this recipe, just adding more confectioners' sugar and less milk to make a fluffier frosting (vs. a glaze).
Brown butter. Who knew?
10 April 2010
02 April 2010
¡Felices Pascuas!
Can you believe we've lived in Buenos Aires for the better part of the past year? ME NEITHER. All of a sudden there are Easter goodies for sale everywhere and I everyone is going on holidays for Semana Santa and it's just like when we arrived last year at this time.
The other day someone asked me what I miss, and one of the things I miss A LOT is my well-stocked kitchen. Guys, I had not one but TWO Kitchen-Aid stand mixers. Here, every apartment we've lived in (and there have been 4 since January) has its own set of kitchen implements, and when we had a brunch party last weekend, I had to borrow dishes and pans and even a whisk. Right now I am not even in possession of a cutting board. It is a sad state of affairs.
And so, on Saturday I'll be on the lookout for a round cake pan, because it's been 3 years since I've made a bunny cake, and that is far too long.
This picture is from 2007. My hair is much longer now.
In case you want to make your very own bunny cake, and may I suggest that you do, here are the instructions I carefully crafted back in 2007.
You need:
• A yummy cake recipe (or a cake mix, no judgments!) - I've made many a successful bunny cake with Epicurious' White Chocolate Layer Cake (omitting the apricot filling) but pick something that's easy for you. Carrot cake makes a sweet brown bunny.
• A round cake pan. You only need one round layer to make the cake, so you can either make two bunnies, or use the rest for cupcakes.
• Frosting (I'm going to recommend homemade for this, but only because I don't know of a store-bought one that isn't sickly sweet - funny that I used to be able to eat that stuff right from the cannister!).
• Coconut (fresh coconut is delish but sweetened shredded coconut in a bag works just as well).
• Green food colouring.
• White paper (regular copier paper is fine) and the pink colouring implement of your choice (a crayon, pencil crayon, highlighter, whatever).
• Jelly beans (for your bunny's eyes and nose, as well as to make a flowery meadow for your bunny).
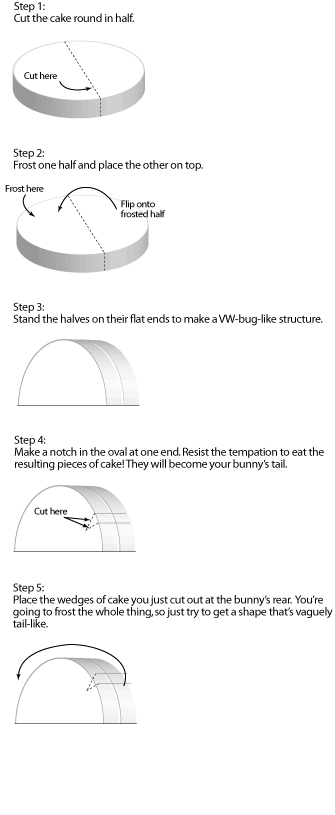
After you've baked your cake, follow these simple instructions to assemble the bunny.
Assembly:
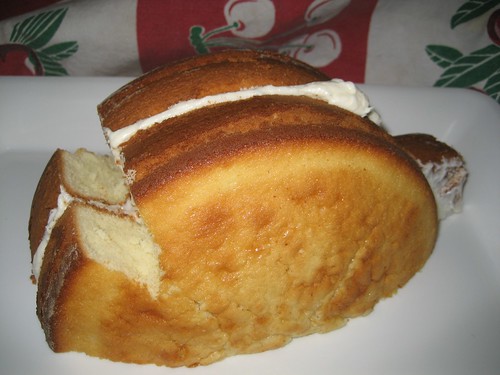
You should have something that looks like this:
Decoration:
• Frost your bunny completely. The tail can get tricky; my best advice is to be generous with your frosting, and don't be afraid to sculpt the tail a little.
• Dye the coconut to make grass: Put some coconut and a few drops of green food colouring in a ziploc bag and squish it all around. If you love coconut, keep some white to sprinkle on the bunny. Spread the green coconut around the bunny so that he's resting in a lovely meadow.
• As you may already have deduced, the bunny's ears will be made of paper. I like to make them after I see my bunny so that they're proportional to his stature - chubbier bunny, chubbier ears. (Hehe, I said "chubby.") Cut your bunny's ears out of the white paper, and add a pretty pink hue to the insides. Tuck the ears behind the bunny's head (where you made the notch out of the cake back in Assembly Step 4).
• Give your bunny jelly bean eyes and a nose.
Voilà! Your bunny is ready to be the centrepiece at your Easter table. Not to mention dessert.
14 March 2010
Apples and Beer
A dinner party, with delicious homemade curries and daal and mango salsa.
Two cakes. One from a light, buttery, spicy batter laced with caramelized chunks of Granny Smith apples.
The other, a mixture of cocoa and stout beer.
Two cakes. One filled with tart lemon curd and frosted with barely-sweet ginger-lemon whipped cream.
The second glazed with a simple and dangerously delicious chocolate-coffee ganache.
The overflow batter from both made into cupcakes: A godsend for our post-party hangovers.
We couldn't decide which we liked better. You'll have to bake them both and decide for yourself.
Chocolate Stout Cake at Smitten Kitchen
Apple Spice Cake at David Lebowitz
Lemon Curd (adapted from Epicurious)
3 large egg yolks
1/3 c sugar
1/3 c fresh lemon juice
2 T butter
In a small heavy saucepan whisk together yolks and sugar and whisk in lemon juice, butter, and a pinch of salt. Cook mixture over moderately low heat, whisking, until it reaches boiling point, 5 to 7 minutes (do not let it boil). Strain curd through a fine sieve into a bowl and cool, its surface covered with a plastic wrap. Chill curd, covered at least 4 hours or overnight.
Ginger-Lemon Whipped Cream
200 g whipping cream
1/4 c confectioners' sugar
1 T freshly grated ginger
1 T lemon zest
Beat cream until soft peaks form. Beat in sugar, ginger, and lemon. Add more ginger or lemon to taste.
08 March 2010
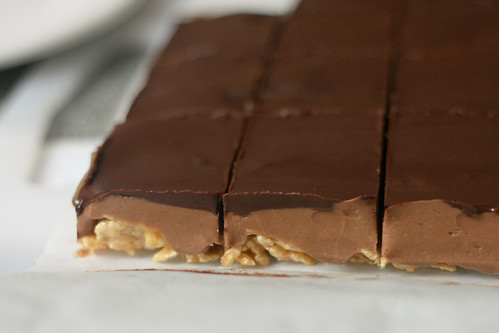
Baking in Buenos Aires (BIBA): Peanut Butter Crispy Bars
Baking in Buenos Aires, especially when one is trying to bake something not typically Argentine, requires translating, sleuthing, and a certain willingness to improvise.
For example, last year I baked chocolate chip cookies without chocolate chips, and a few weeks ago I baked cupcakes in flan moulds. I've learned that confectioner's sugar is called azúcar impalpable, and that brown sugar is called azúcar rubia (blond sugar). And I hate to admit this, but I still haven't found real vanilla extract and have been baking with its artificial redheaded stepchild. Don't tell Martha.
On Sunday we had a potluck dinner to attend, and with all the healthy eating that's been going on around here I wanted to make something indulgent. I decided on Baked's Peanut Butter Crispy Bars and their simple and ridiculously decadent list of ingredients: peanut butter, butter, milk & dark chocolate, sugar, and corn syrup. Oh, and Rice Krispies.
It turns out, however, that in Buenos Aires, Rice Krispies are nowhere to be had. I went to three grocery stores in search of the snap, crackle and pop that, with its various flavours and box sizes, takes up half of most North American cereal aisles, but no luck. I settled for Special K (the only puffed-rice cereal I could find). The Special K flakes were much bigger than Rice Krispies, and they tasted a bit too... healthy. Then the corn syrup wasn't quite light, as the recipe calls for, and the resulting caramel was a bit cloying. And peanut butter here is mostly the super-natural no-salt-no-sugar kind, so the second layer (peanut butter and milk chocolate) didn't seem quite sweet enough and tasted almost overly peanut-buttery. Top layer notwithstanding (I have yet to meet a mixture of melted butter and chocolate that I didn't like), I had my doubts about this recipe as I was creating it.
And even when I tasted the final product, I wasn't sure. They had all the right elements for deliciousness: caramel, peanut butter, chocolate, and crunch. Despite all these wonderful characteristics, something wasn't quite right. I wasn't even sure I wanted these bars to represent at the potluck. I almost threw the whole batch in the garbage, thinking, these bars aren't worth their salt.
Salt.
Salt!
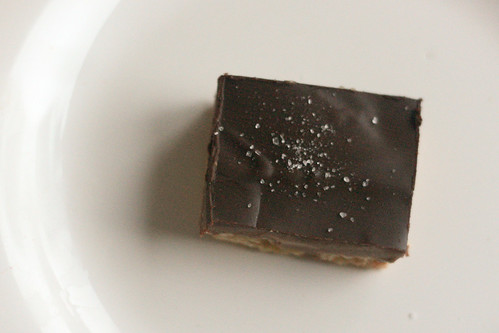
I grabbed a bar out of the fridge and sprinkled it with sea salt, and the sun broke through the clouds and made that salt sparkle like Sandra Bullock's Oscar dress, and lo, the much-adapted Peanut Butter Crispy Bar became greater than the sum of its parts. And North and South Americans alike loved them at the party: They were gone--devoured--within minutes of our arrival. I suspect they'd taste even more delicious after a day or two, but, yeah. Good luck with that.
The original recipe, which will withstand liberal adaptation, is at Smitten Kitchen.
04 March 2010
More Breakfast: Homemade Granola
I used to make granola at home all the time. But that was back in the land of (relatively) cheap maple syrup, which is all I'd ever used as a sweetener. That's not to say you can't find maple syrup in Argentina, and it's even Canadian, but a small bottle costs as much as a perfectly-grilled filet mignon that's big enough to share, and a half-litre of Malbec.
But I've been stubborn, and while I don't recommend substituting Malbec for your maple syrup (except maybe on pancakes?), honey is a viable alternative. As for the other ingredients, Buenos Aires is rife with dietéticas, or natural food stores, they're often expensive, so last week I wandered into my new favourite place in Buenos Aires: Barrio Chino, or Chinatown. Chinatown here is really less of a neighbourhood and more of a block, but you can still find lots of what you'd expect to find in any Chinatown worth its salt: Myriad knicknacks, chicken feet, and delicious fried goodies. And Buenos Aires' Chinatown has a store called Casa China that is overflowing with imported sauces, teas, and, just in case you're making granola, piles of dried fruits and whole grains.
Homemade Granola
3 c old-fashioned rolled oats
1-2 c chopped dried fruit and/or nuts and/or other healthy goodies (like ground flax seeds, sesame seeds, or wheat germ)
1/3 c sweetener (maple syrup is my first choice, but honey works well too, and I'm sure agave nectar would also be delicious).
Toss the oats and any nuts you're including with the sweetener. Spread on a baking sheet or 2 and toast in the oven. The time will vary depending on your oven. Trivia: In the 5 apartments in which we've lived in Buenos Aires, only one has had temperature indication on the oven. I've been winging it, and so far, so good. Anyway, set yours to 350°F and give the oats/nuts a stir after 15 minutes so they toast evenly.
Once your oats are toasty, let them cool, then stir in your dried fruit (including any coconut. If you want to toast the coconut--toasted coconut is super-delicious, especially on waffles and oatmeal, but I digress--do it separately, as it has a tendency to burn and might even set your toaster oven on fire. Or so I've heard). I used dates, pears, and apricots, walnuts, and sunflower seeds, and about 1/3 c toasted wheat germ. I recommend adding a sprinkle of sea salt to boost the flavour.
Granola keeps for several weeks in an airtight container.
28 February 2010
Superbreakfast of the Future
By now everyone knows what quinoa is, right? The supergrain of the future? If you're not yet familiar with this Saturny-grain, hop on over to Wikipedia for the rundown. Go on, I'll wait.
OK, so by now you know it's pronounced KEEN-wah and it comes mostly from Peru and it's very nutritious. But what you might not know is that it's really easy to cook AND it's delicious! Usually it's served in place of rice or other grains as a side dish. In Peru it's often found in granola bars, and in Bolivia, it's made into a warm breakfast drink.
The other day Meg at Not Martha posted a link to a quinoa thread on Ask MetaFilter, and casually mentioned that plain quinoa topped with an over easy or poached egg is her favourite breakfast. I did a bunch of googling for breakfast quinoa recipes but found mostly sweet options. Then I remembered Mark Bittman talking eating savoury oatmeal with soy sauce and scallions, and I got to thinking. I do love my oatmeal, but it would be nice to have more protein with breakfast, and the ability to poach an egg just happens to be one of my superpowers. And unlike flying or x-ray vision, all it took was a little practice.
Quinoa with Soy Sauce and a Poached Egg
makes 1 serving
1/4 c quinoa, rinsed
1 egg
white vinegar
sea salt
soy sauce
freshly ground pepper
Put the quinoa in a small saucepan and add 1/2 cup water. Cover and bring to a boil, then reduce heat and simmer, still covered, for about 10 minutes.
While the quinoa is cooking, heat a shallow pot (about 2 inches) of water to boiling, then reduce heat so it's just bubbling a little, but barely. Stir in a splash of vinegar (1-2 tsp) and about a tsp of salt.
Crack the egg into a ramekin or other small bowl. Using a wooden spoon, stir the simmering water to make a vortex, and gently tip the egg into the centre of the vortex.
If you timed everything just so, your quinoa should be just about done. If you can see a tiny ring around each grain but there's still a lot of liquid in the pot, remove the lid to let the water evaporate, then spoon the quinoa into a bowl. Add a few drops of soy sauce, just, you know, however much you like. When your egg is poached to perfection, remove it from the pot with a slotted spoon and place it on top of the quinoa. Sprinkle with salt and pepper to taste.
Shortcuts: You can pre-cook the quinoa whenever you have time. Store it in a closed container in the fridge, and at breakfast time either warm it in the microwave or steam it on the stove. If you're really pressed for time you can also use soft-to-medium boiled eggs, but I urge you to practice poaching eggs - it's an impressive skill, and one that can bring you much deliciousness.
More on eggs: I learned how to poach an egg following the instructions on Epicurious. As for boiling eggs, I like to put a few eggs in a pot, add enough water to cover the eggs, then bring to a boil. Once the water is boiling, cover the pot and remove it from the heat. Your eggs will be soft-boiled in 4-5 minutes, and hard-boiled in about 8 minutes. Rinse the eggs immediately in cold water to make them easier to peel.
20 February 2010
Sofía's Birthday Cupcakes
If you've been following along on my personal blog, you already know things have been a slow in my life, as I have a knee to heal. I haven't been tasting new fruits or cooking much of anything, and while baking is my therapy, I'm trying to curb that too since even though I spend almost 2 hours at the gym every day, working out only one leg doesn't burn as many calories as I'd like.
This week our beloved Spanish teacher. Sofía, celebrated her birthday, and as I'm not one to show up to a birthday party empty-handed, I decided to bake cupcakes. Baking cupcakes is no easy feat in Buenos Aires. Muffin tins are hard to come by, to say the least, and paper liners are scarce. But Ken went to the party store (yes, there are party stores! In abundance!) and came home with flan moulds in which to bake the cupcakes. Genius!
And so I spent Friday afternoon, in almost-unbearable heat and humidity, baking vanilla cupcakes for Sofía, because I love her. And I baked them seven at a time, because that's how many flan moulds were available at the party store.
Around 8 p.m. I texted Sofía to get the party details, and found out that I'd misread her email: The party is next Friday. Oops. What's a girl to do with 16 delicious vanilla cupcakes with chocolate frosting?
Luckily I had plans this afternoon to attend an English-language book exchange, so I brought them along. (It was either that or eat them all, 2 at a time.) And hopefully when I bake them again this Friday, it won't be quite so hot.
Amy Sedaris' Vanilla Cupcakes (recipe from Epicurious.com)
1 1/2 sticks unsalted butter
1 1/2 cups sugar
2 eggs
2 teaspoons pure vanilla extract
2 1/2 teaspoons baking powder
1/4 teaspoon salt
2 1/2 cups flour
1 1/4 cups milk
Amy's Instructions:
Turn oven on to 375 degrees F.
Put butter in mixer and beat at medium speed until somewhat smooth. Pour in sugar and beat well. Add 2 eggs. I like to crack the eggs on the side of the bowl while it is moving, which can be really stupid. I like to take chances. Yes, I have had to throw away my batter because I lost eggshells in the mix. Yes, it was a waste of food and yes, I know how expensive butter is, but what can I say? I'm a daredevil. Mix well. Add: vanilla, baking powder, salt, flour, and milk. Beat until it looks like it is supposed to and pour into individual baking cups, until they are about 2/3 full. Bake for 20 minutes or until golden brown. Should produce 24 cupcakes; I get 18 because I'm doing something wrong, although my cupcakes were voted second best in the city by New York Magazine.
Ed. note: I got 16 1/2 because I'm doing something really wrong, which is called baking cupcakes in flan moulds. And also because I really like cupcake batter.
Magnolia-ish Chocolate Frosting
150 g bittersweet chocolate (minimum 60%)
75 g butter, room temperature
250 g confectioners sugar (a.k.a. powdered sugar, icing sugar (Canada), or azucar palpalble (Argentina))
1 t vanilla extract
2-3 T milk
Melt the chocolate using your preferred method of melting (double-boiler, microwave, direct sunlight). Beat in the butter (a mixer works best, but elbow grease works too, and think of how great your arms will look!). Beat in the vanilla, then add the confectioners sugar slowly (or else you'll be covered in it). Keep mixing until it's all mixed together, and then a little longer for good measure. Add milk a little at a time to get the right consistency. I like to taste it along the way - you know, just to make sure it's delicious enough.
I say this is Magnoia-ish because it's not officially their recipe, but it tastes a lot like it. This recipe made just enough frosting for my aforementioned 16 cupcakes, so if your cupcake recipe yielded more, or you just like piles of (very sweet) frosting, adjust away!
Labels:
argentina,
baking in buenos aires,
birthday,
cupcakes
05 February 2010
Snack
Reblogging in honour of World Nutella Day, because it makes me infinitely happy that such a thing exists. Sadly, Nutella is prohibitively expensive here in Argentina, but it's hard to complain when the dulce de leche flows so freely. Still, if someone handed me a slice of homemade bread slathered in Nutella right now, I wouldn't complain.
The fine print: WND is co-hosted by Ms Adventures in Italy and Bleeding Espresso.
Subscribe to:
Posts (Atom)